In this exercise we will learn how to add to a cumbia project a custom widget to display or write data.
Requirements
The following components must be installed:
- cumbia
- cumbia-tango
- cumbia-qtcontrols
- qumbia-tango-controls
- qumbia-plugins/qt-designer
- qumbia-apps/cuuimake, the tool to process ui, pro, h and cpp files and
- qumbia-apps/qumbiaprojectwizard, the tool to create a new cumbia project
Install qumbiaprojectwizard
Change directory into qumbia-apps/qumbianewcontrolwizard and execute
To build all the qumbia-apps utilities, the same code can be run from the qumbia-apps parent directory.
Command line
Use cumbia new project to create a new cumbia project
Create a new project referring to tutorial_qumbiatango
In this example, we create our project under the devel/exercises directory in the home user. The project name is CumbiaCustomControls.
The qumbiaprojectwizard utility can be launched with
A picture of the qumbiaprojectwizard application follows.
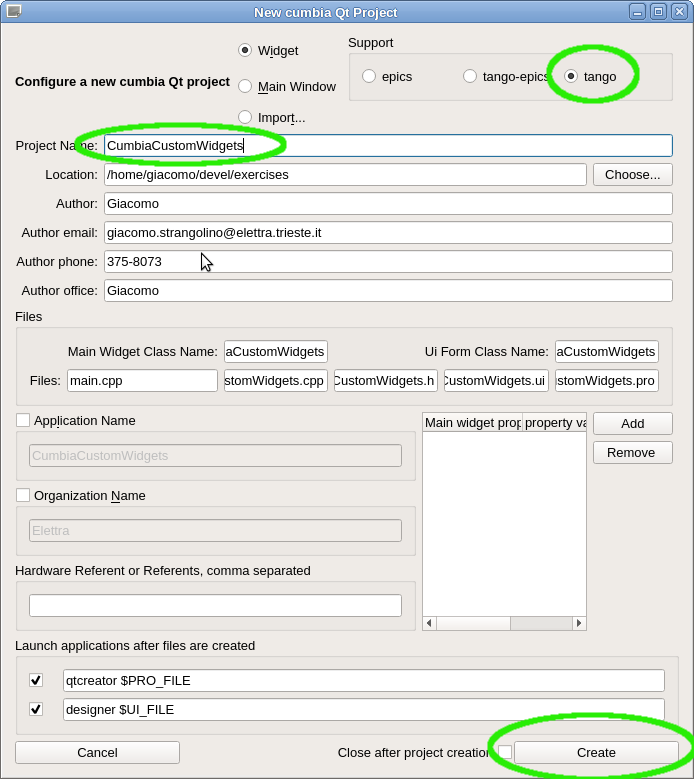
Choose tango in the Support box, select the location and click on create. We could select epics or tango-epics as well and nothing would change in the following procedure.
Once the Create button has been clicked, the project skeleton has been generated in the chosen directory and Qt designer and Qt creator have been started automatically.
Edit the form in the Qt designer and add
- a QLabel with the name of the tango double_scalar attribute (base Qt widget);
- a QuLabel with the "$1/double_scalar" source, as shown in the picture below (a cumbia-qtcontrols base widget);
- a QuApplyNumeric with the "$1/double_scalar" target (another cumbia-qtcontrols base widget)
The form will include two additional control elements that are not part of the cumbia-qtcontrols distribution. They are simple Qt widgets that will later be promoted to custom cumbia widgets. One will become a cumbia reader, the other a writer. Let's add these two elements:
- a QTreeWidget with two columns: it will show the history of the double_scalar attribute (with a configurable number of rows)
- a QDial to change the value of the double_scalar
- a QSpinBox to set the maximum depth of the history in the QTreeWidget
Finally, place a couple of labels to describe the additional elements.
The double_scalar is a Tango attribute available from the TangoTest device distributed with the Tango software package. The $1 is a wildcard that is substituted at runtime with the first command line argument that represents a Tango device name. The application will be started with this command:
supposing that the TangoTest device defined in the Tango database is named test/device/1 (it could be sys/tg_test/1 or something else, depending on how you installed the Tango software).
Since the cumbia new control utility will create objects fitted with the source property to set up the connection end point for the reader and the target property for the writer, select the QTreeWidget on the Qt designer form, go to the property editor, click on the plus (+) icon and choose string.
Below is a screenshot of the Qt designer with the elements listed above:
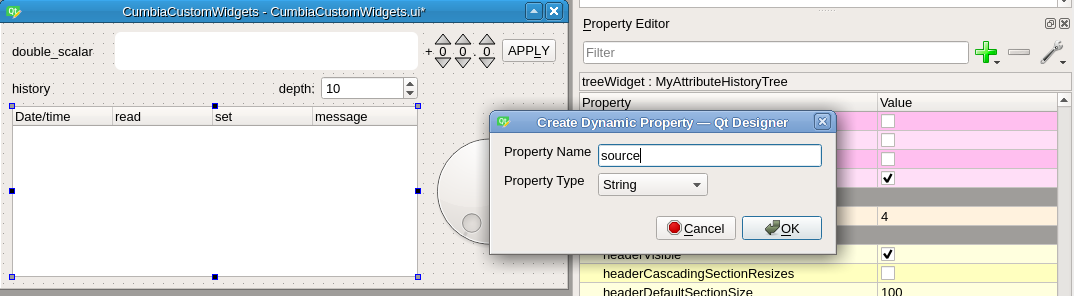
Once you click Ok, the Property Editor scrolls down to the bottom, focusing on the new source property in the Dynamic Properties view. Type $1/double_scalar in the source field.
Do the very same with the QDial, using target as property name and $1/double_scalar as property value.
Save the form and proceed to the next paragraph to create the custom widgets to integrate in the cumbia project.
Use cumbia new control to write the custom reader and writer
Open a terminal and move to the new project directory:
Start the cumbia new control application:
The application should have detected the qt project file "*CumbiaCustomWidgets.pro*" because it has been launched from within a folder where a Qt project resides. At the bottom, you should see the correct path plus the src directory, because the project carpet contains a src sub directory. If everything is as expected proceed to generate the skeleton code for the custom reader and writer.
Generate the custom reader
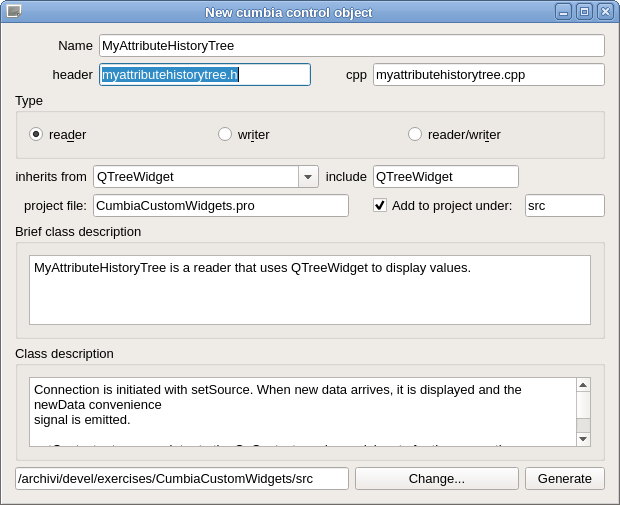
In the New cumbia control object window:
- type the name of the control in the Name text box at the top: MyAttributeHistoryTree;
- from the inherits from drop down menu, choose QTreeWidget. The include field should be updated accordingly;
- check that the reader radio button is selected
If you leave the Add to project under check box is active, the application will add the myattributehistorytree.h and myattributehistorytree.cpp files to the project. You can optionally modify the brief class description and the Class description fields that will make up the class documentation.
Click on the Generate button. If you switch to the Qt creator window, you should see the two new files in the project file list. If you open them, you'll recognize the structure of a working reader!
Generate the custom writer
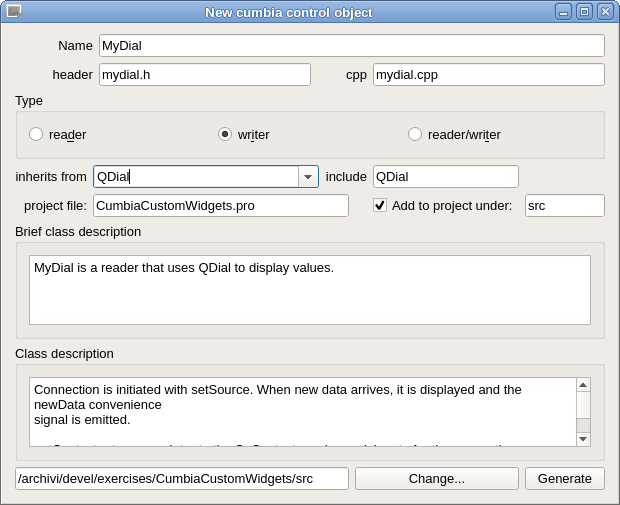
Go back to the New cumbia control object window.
- change the Name of the new class to MyDial
- click on the writer button in the Type box
- select QDial as parent widget from the inherits from drop down list
You should see that some fields have been updated accordingly for you: the header and cpp file names and the descriptions.
Click on Generate once again and verify that MyDial has been added to the Qt creator project.
Try to build the project
Go to the terminal window previously opened in the *~/devel/exercises/CumbiaCustomWidgets* directory and try to build the project
The output should look like this:

If you run
the project should compile smoothly.
Yet, this is not the end of the story, because the user interface form previously laid out with the designer still employs the base Qt QTreeWidget and QDial classes. Go to the designer, select the QTreeWidget, right click on it and choose Promote to...; In the Promoted class name field type MyAttributeHistoryTree, click on Add, then Promote:
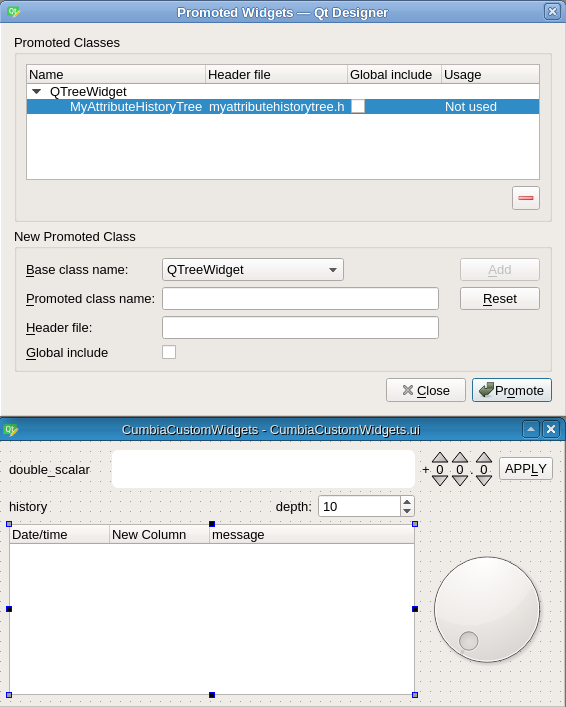
As you can see from the picture above, the name of the header file should match the file in the project.
Do the same with QDial and promote it to MyDial.
Save the form.
Go back to the console and type
The project builds and if we start the application
we can see that the QuLabel and QuApplyNumeric are working.
cumbia new control has created the skeleton of the custom reader (MyAttributeHistoryTree) and writer (MyDial). To activate them, a couple of things still have to be done:
- QDial valueChanged(int) signal must be connected to the write(int) slot. The slot is already declared and implemented in the generated files, the signal/slot connection is also there but has to be uncommented in MyDial constructor:
- the MyAttributeHistoryTree specific code must be written in the onUpdate method so that every time a new value is available, it is recorded in the history. When the number of items in the history reaches the history depth value (displayed in the depth spinbox), the oldest records must be removed.
Activate the dial signal/slot connection
Open mydial.cpp and look for the m_create_connections method. You will find a commented section with several signal/slot connections prepared for you. Uncomment the first one to activate the writings when the dial is rotated:
If you rebuild and execute the application, the dial is now able to write!
Implement the history view
Open the myattributehistorytree.cpp file and locate the onUpdate method. This is the callback where cumbia delivers new data fetched from the source. If the number of displayed items is greater then or equal to the history depth, we will remove the excess ones. The current depth can be stored as an integer class attribute defined in the MyAttributeHistoryTreePrivate class defined in the very same .cpp file:
A slot in MyAttributeHistoryTree class and a signal/slot connection in CumbiaCustomWidgets.cpp must be added so that when the depth spinbox value changes, the depth in the MyAttributeHistoryTree is updated:
In myattributehistorytree.h:
In CumbiaCustomWidgets.cpp constructor, write the signal/slot connection after using the same setHistoryDepth slot to initialise the depth value:
If you use Qt creator, go back to myattributehistorytree.h, right click on the setHistoryDepth slot definition and choose Refactor -> add Definition in myattributehistorytree.cpp to insert the implementation of the slot into the cpp file.
In myattributehistorytree.cpp, you may want find the m_init function and initialize the depth private attribute to 10:
Then write the implementation of setHistoryDepth:
Everything is now ready for the final step: integrate the onUpdate method to show the attribute history with the desired depth. Locate the onUpdate function. You will see that the message from the engine is extracted first and the quality of the read operation is saved into the read_ok class attribute. The widget is enabled if the reading is successful and the link statistics are updated. Remove the setEnabled line and also the setToolTip because they are not necessary given the nature of this display widget:
The remaining code in the same method offers a generic solution to set a value on simple widgets exporting methods or properties like setValue (property: value), setText (text), setCurrentText (currentText). Our base class is more complex: a QTreeWidget where, in every row, we display four pieces of information:
- the date and time of the operation
- the value read
- the set point value (if present)
- the outcome of the operation
We fetch the necessary information from the following fields from the CuData passed as parameter to the onUpdate, converting it to string since the columns of a tree widget item (QTreeWidgetItem) are strings:
- data["value"].toString()
- data["w_value"].toString() (if data.containsKey("w_value"))
- data["timestamp_ms"].toLongInt() as to the CuData bundle description for data exchange with the Tango world documentation, "CuData bundle description for data exchange with the Tango world" table.
- data["message"].toString()
Converting CuData "value" and "w_value" to string is not only proper for displaying in the columns of a QTreeWidgetItem; it is often a good generic approach to display values whose type is not known aprioristically.
After these considerations, complete the project. Remove all the automatically generated code that follows:
and proceed with the code integration. Truncate to 30 characters the message to be set on the column index 3 of the tree widget and set the entire message as tooltip instead. Set the color of the first and fourth column of the items according to the reading outcome. If you want to reuse MyAttributeHistoryTree class, it can be a good idea to emit the newData signal at the end.
The picture below shows the application now completed.
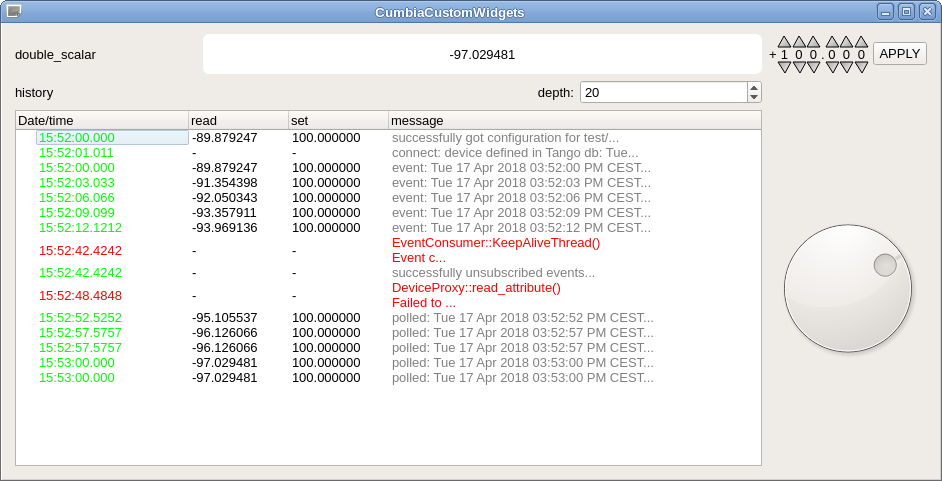
As you can see, there were seven successful readings from the tango event system, then an error occurred (15:52:48.4242) and the cumbia-tango engine switched to polling mode (see the line "successfully unsubscribed events..").
The test/device/1 Tango device was still not responding to the poller at 15:52:48.4848 before going online again at 15:52:52.
Generated on Fri Aug 16 2024 17:07:47 for cumbia new control by